Hello, code explorer!
If you've arrived here, it's because at some point you searched for or were redirected to something related to README.md files.
Without further ado, README files have existed since the early days of the first code sharing. There isn't an exact date of when this came up or who was the first programmer to propose it, but the fact is that the existence of these files emerged precisely when several programmers interacted with the same code using version control systems (Git / TortoiseSVN / others).
Essentially, the idea of a README file is to provide the user with the basic information they need to read, process, or interact with a specific program or source code. Therefore, it should be the first file that the user or reader of that source code/product should pay attention to.
A very common and accepted analogy is this:
README > READ ME FIRST > USER MANUAL
But after all, what is the format of a README file and how do you create one?
Each platform or product usually has its own file format for this purpose. In the era of CD-ROMs, these files generally had the ".txt" extension. However, over time and with the increasing popularity of code versioning platforms (GitHub, GitLab, among others), the community adopted the ".md" extension as the standard format.
Today, the majority of code repositories and software manufacturer websites use the ".md" format combined with HTML markup, and this combination has several advantages.
The use of HTML markups allows for the creation of interactive objects (animations, links, text effects, etc.).
See the example below:

To apply this type of effect, simply use the code snippet below (modifying the attributes, obviously 🙂):
- [![Twitter Badge] (https://img.shields.io/badge/-@GiovaniLeiteVitor-1ca0f1?style=flat-square&labelColor=1ca0f1&logo=twitter&logoColor=white)](https://twitter.com/GiovaniLLeite)
- [![Linkedin Badge] (https://img.shields.io/badge/-GiovaniLeiteVitor-blue?style=flat-square&logo=Linkedin&logoColor=white)](https://www.linkedin.com/in/giovani-leite-vitor-7803961b9/)
- [![Medium Badge] (https://img.shields.io/badge/-@giovanileitevitor-000000?style=flat-square&labelColor=000000&logo=Medium)](https://medium.com/@giovanileitevitor)
To visualise the complete README file, simply access the following link:
https://github.com/giovanileitevitor/giovanileitevitor/blob/main/README.md
How do I create a README file in my repository?
Each platform generally has its own mechanism, but for a starting point I will use GitHub as an example, as it is a free and extremely popular platform in the software development community.
Here's a step-by-step guide:
- Create an account on GitHub (https://github.com/signup);
- After completing all the steps and having access to your main page within GitHub, you should see a page with a menu similar to this:

- Click on the "Repositories" option (if your account is configured in another language, click on the button that allows you to access your repositories);
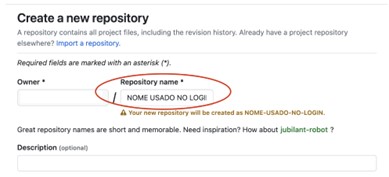
- Now click on the "New" button, which will be in the top right corner of the screen. But before doing that, have the name you defined as your account login ready;

- On the next screen, enter the name you defined as the repository name:
- Then, check the option "Add a README file".
Note: This repository is usually kept "Public", because its purpose is to be the first screen or instruction that people will see when accessing your page on GitHub.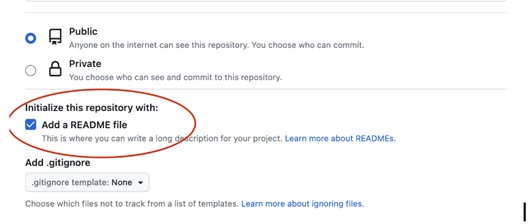
- After that, click on the "Create Repository" button at the bottom right of the screen:

- There you go: your entry repository is created, and it already contains a basic README.md file;
The next step consists of editing the file itself and, at this point, there is a wide range of possibilities. In the image below I show a structure that I often use in my projects.
This structure is basically composed of:
-
Head (# head name);
-
Head Description (common text without tabs or symbols);
-
Body Title (## body title or subtitle);
-
Body Description (common text without tabs or symbols).
-
Images URLs (<img width=25% height=25% alt="image description" src="image http address"> ).
Notice that each element has special markup represented inside the brackets by the symbol #.
That's the great thing about HTML markups in a README file: you can generate infinite combinations and formats. It's also possible to add JS scripts and applets (to the delight of old-school programmers).
Useful links to complement understanding and the correct use of README files: